Preliminary operation
There are basically two ways to create a virtual machine: the first is to get theISO image of the operating system to be virtualized (in this case, Windows), create the virtual machine and install the previously downloaded operating system on it (as you would on a real PC). The second, however, consists in downloading the virtual machine ready to use and import them into a virtualization program, such as VirtualBox o Parallels Desktop, which I will tell you about in this tutorial.
If, therefore, your intention is to download the Windows image file and install the operating system "manually" inside a virtual machine, connected to the Microsoft website and download the Windows ISO files by following the instructions you find in my tutorials on how to download Windows 7, how to download Windows 8 and how to download Windows 10. It should be emphasized that the copies of Windows installed in virtual machines must be activated normally like those installed on PCs.
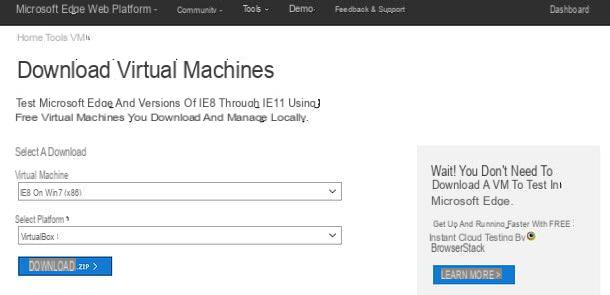
If, on the other hand, you prefer to have virtual machine ready to use, linked to this page of the Microsoft website that hosts the virtual machines to test Internet Explorer and Microsoft Edge, select the version of Windows of your interest (lE8 on Win7 (x86), IE9 on Win7 (x86), lE1O on Win7 (x86), IE11 on Win7 (x86), lE11 on Win81 (x86) o MSEdge on Win1O (x64)) from the drop-down menu Virtual machine, choose the virtualization program you intend to use (eg. VirtualBox o Parallels) from the drop-down menu Select platform and presses the button DOWNLOAD .ZIP to start the virtual machine download. It should be noted that the virtual machines offered by Microsoft have an expiry date set at 90 days, after which they must be restored (via snapshots, which can be created at any time before the expiration date, or by importing the virtual machine again within the virtualization program) . The password for the VM is usually Passw0rd, in any case it is indicated at the bottom of the download page.
Virtualize Windows on Mac with VirtualBox

Be vuoi scoprire how to virtualize windows on mac for free, you need to contact VirtualBox, a famous free and open source virtualization program available for Windows, macOS and Linux which, although it is not intuitive and does not guarantee high performance like the competing paid software, is extremely valid.
To download VirtualBox on your Mac, connected to the official website of the program and click on the item OS X hosts. When the download is complete, double-click on it and open the file you just downloaded (VirtualBox–xx-OSX.dmg) and, in the window that opens, open the package VirtualBox.pkg to start the program installation process.
Now, click on first Continue twice in a row and then on Install. Type the password of your user account on macOS and press the key Submit on the Mac keyboard. Then wait for the procedure to finish and, when finished, click the buttons Close e Don't move it to close the setup window.

Create a virtual machine
To create a new virtual machine in VirtualBox, start the program from Launchpad or dalla cartella Applications macOS and click on the button New which is located at the top left to start creating a new virtual machine. In the window that opens, select the version of Windows you want to virtualize (eg. Windows 7) from the drop-down menu Version, type the name you want to assign to the virtual machine in the field Your name and click sul pulsating Continue to continue the procedure.

At this point, set the amount of RAM to be reserved for the virtual machine (never go below the value recommended by VirtualBox) and click again on Continue. Then put the check mark next to the item Create a virtual hard drive now and click sul pulsating Crea to start creating a new virtual hard disk on which to install Windows.

Confirm the use of the format VDI VirtualBox and click on Continue to go on, then put the check mark next to the item Dynamically allocated to make the virtual hard disk take up space on the real hard disk of the Mac only when needed and click once again on Continue to determine the size of the disk. As for RAM, also in this case I suggest you leave the default value or raise it (in case you need to install several programs on virtualized Windows). To complete the procedure, click on Crea.

Now you are ready to “start up” your virtual machine to install the copy of Windows to be virtualized on it. This can be done in two ways: using an ISO image file from the Windows installation disc (option I recommend) or physically inserting the operating system installation CD / DVD into your computer.
If, as I highly recommend, you want to install Windows on your virtual machine using an ISO image file, you have to start your virtual machine by double clicking on its name (in the main screen of VirtualBox), after which you must indicate the ISO file to be used by clicking on the icon gialla poster that appears in the center of the screen and pressing the button Home.

Perfect: now you just have to run the Windows installation just as if you were installing the operating system on a PC after a format. If you are not very familiar with this type of procedure, you can help yourself with my articles dedicated to how to install Windows XP, how to install Windows 7, how to install Windows 8 and how to install Windows 10.
At the end of the operation (generally it takes 20-25 minutes but the duration depends on the power of your computer), you can run Windows on your Mac simply by starting VirtualBox and double clicking on the name of the virtual machine on which you have installed the operating system Microsoft (eg. Windows 7).

Before you get down to business, however, I recommend that you install the Guest Additions VirtualBox: these are drivers that allow you to improve the operation of virtual machines (for example graphics performance) and to better integrate with the system that hosts it.
To install the Guest Additions in your virtual machine, select the item Install Guest Additions CD image… from the menu Devices which is located at the top. The Guest Additions ISO image will be mounted. Go, therefore, to Start> This PC (o Start> Computer, depending on the version of Windows you have installed in the VM), open theunità CD VirtualBox Guest Additions and launch the executable VBoxWindowsAdditions-amd64.exe o VBoxWindowsAdditions-x86.exeSecondly, a 64 or 32 bit version of Windows was used.
In the window that opens, click in sequence on the buttons Yes, Next, Next, install e Finish to complete the Guest Additions installation and restart the virtual machine.

Another operation that I advise you to do is to select the elements shared between the real system and the virtual system. To do this, select your virtual machine from the main VirtualBox window and click on the button Settings which is located at the top.
In the window that opens, select the tab Generalwhy are you cheating? Advanced and choose whether or not to enable clipboard sharing and file drag and drop support using the drop-down menus Shared notes e Drag and drop. To choose the Mac folders to share with Windows, go to the tab Shared folders, click on sull'icona della folder with (+) symbol which is on the right and select a folder to share. Once this is done, put the check mark next to the item Automatic assembly and presses the button OK. You will then find the folder in the Windows Network Neighborhood by opening theFile Explorer and selecting the network path of VirtualBox in the left sidebar.

To shut down a running virtual machine, click on red dot located at the top left, put the check mark next to the item Save the machine state and click on OK. In this way, the VM will be "frozen" and you can resume work at any time. To turn it off completely, however, you need to put the check mark next to the item Send the shutdown signal or you have to shut down Windows as if you were using a real PC. Finally, there is the option Power off the machine which forcibly shuts down the virtual machine.
Import an existing virtual machine

You downloaded one Windows virtual machine ready to use and do you want to import it into VirtualBox? Nothing easier. After extracting the VM from the zip archive in which it was contained, open VirtualBox and select the item Import virtual application from the menu Fillet which is located at the top left.
In the window that opens, click on the icon of gialla poster, select the virtual machine file to import and follow the on-screen instructions to complete the VM import. At the end of the procedure, you will find your virtual machine ready to use in the main VirtualBox window.
If you have downloaded a VM in VDI format (therefore in the form of a virtual hard disk), you must click on the button New to start the procedure for creating a new virtual machine, after which you must choose the name to be assigned to it, you must indicate the operating system to be installed in it (as I explained to you in the previous chapter of the tutorial) and the amount of RAM to assign them.
Once in the part of the wizard dedicated to the hard disk, you have to put the check mark next to the item Use an existing virtual hard disk file, you have to click on the icon of gialla poster and you need to select the file VDI of the VM you downloaded from the Internet. After this step, click on the button Crea to create your virtual machine and start using it.
Please note: if necessary, you can uninstall VirtualBox from your Mac by opening the dmg file that contains the program installation file and running the executable VirtualBox_Uninstall.
Virtualize Windows su Mac with Parallels Desktop

If VirtualBox did not satisfy you and / or you are looking for a more complete solution to virtualize Windows on Mac, I suggest you try Parallels Desktop, which is one of the most advanced and used virtualization software in the Mac field.
As you can easily guess, it is not free: it costs 79,99 euros one-off or 99,99 euros / year in subscription to have access to all subsequent major releases, but you can try it for free for 14 days. It places a step above VirtualBox for its better performance and greater ease of use. It also makes real system and virtualized system integrate much better (for example, you can access your Mac's personal folders from Windows, you can drag and drop files and folders and you can even activate the view mode. Coherence, which integrates Windows windows and menus into macOS). Another very useful feature of Parallels is that it allows you to install operating systems such as Windows 10 and Ubuntu with a single click, without having to download the related image files separately.
To download the trial version of Parallels Desktop, connect to the official website of the program and click on the button first Free trial e poi quello Download now. Once the download is complete, open the dmg package which contains Parallels Desktop and launches the executable Install present inside.
Nella finestra che si apre, fai clic sul pulsado apri and wait for the software to process some data. Then type the administration password of the Mac, come on Submit and wait a few seconds for the setup to be completed automatically. When the program starts, he agrees to use his evaluation version pressing the appropriate button.

Create a virtual machine
Once the Parallels Desktop installation is complete, you can create your VM with Windows by starting the program and clicking on the button [+] present in its main window (or by selecting the item New from the menu Fillet which is located at the top).
In the screen that is shown to you, choose how to proceed: by clicking on the item Get Windows 10 from Microsoft you can create a VM with Windows 10 by letting Parallels automatically download the system from the Internet; choosing Install Windows or another OS from a DVD or image file and then clicking on the buttons NEXT e Choose manually you can install Windows from a separately downloaded ISO file, while selecting one of the free systems listed below you can automatically download and create VMs with Windows, Android and various Linux distros. Finally, I point out the option Transfer Windows from a PC, which allows you to transfer a real Windows installation to a virtual machine.

For my example I chose the option Install Windows or another OS from a DVD or image file. After selecting the ISO file of the system to be installed in the VM, click on the button NEXT, enter the product key Windows (optional, if you want to skip this step when installing the operating system) and click again NEXT.
Then you need to choose the type of use to be made of the virtual machine between productivity e games and set the name for the VM. If you want, before clicking on the button Crea and start the creation of the virtual machine, put the check mark next to the item Customize the settings before installation, in order to set all the technical parameters of the VM.

A window will then open with all the properties of the virtual machine: to set the quantity of RAM, dimensions ofhard drive etc., select the tab Hardware and then use the options in the left sidebar (eg. CPU and memory to adjust the processor and RAM settings or Hard disk to choose the space to reserve for the hard disk). Once the configuration is complete, close the window and click on the button NEXT to start installing Windows in the VM.
Part of the process could happen automatically, but you will almost certainly be called to one or more interventions during setup. Therefore, I recommend that you refer to my tutorials on how to install Windows XP, how to install Windows 7, how to install Windows 8 and how to install Windows 10 to understand how to proceed.

After the installation is complete, start your virtual machine by clicking on its preview in the main Parallels Desktop window and wait for the Parallels Tools, i.e. the drivers necessary for the operation of the virtual machine and its integration with the real system.
Import an existing virtual machine

If you want to import an existing virtual machine into Parallels Desktop, all you have to do is select the item apri from the menu Fillet and select the VM to import. Alternatively, you can double-click the virtual machine (in pvm) and it will be automatically imported into Parallels. Easier than that ?!
Please note: Parallels Desktop can be uninstalled from the Mac by simply dragging its icon to the Trash and emptying the Trash. Remember, then, to also delete the VM files, which are very large.
Other useful solutions

The solutions I have shown you in the previous paragraphs are certainly among the most valid for using Windows on Mac, but they are not the only ones. Below, in fact, I propose other interesting software that, perhaps, could be for you.
- VMware Fusion - it is one of the best alternatives to Parallels and VirtualBox for Mac. We are therefore talking about an excellent virtualization program, which as you may already know is also available for Windows. It costs 71,17 euros, but is available in a free trial version that allows you to test all its features for a limited time.
- Boot Camp - this is the tool included "standard" in all Macs, which allows you to create a new partition on the disk and install a "real" copy of Windows, with its drivers. I have explained to you in detail how to install Windows on Mac using Boot Camp in my tutorial dedicated to the topic.
- PlayOnMac - is not a real virtualization software, but a program that allows you to install individual programs for Windows (those in exe format) on macOS. It has many limitations, but in some cases it can be really useful. I told you how to use it best in my tutorial on how to open exe files on Mac.


