See PC features with Windows 7 default tools
If you want see the characteristics of a PC on which it is installed Windows 7, you can proceed through some predefined tools offered by the same operating system. In the next few paragraphs, I will explain them to you in detail.
System properties
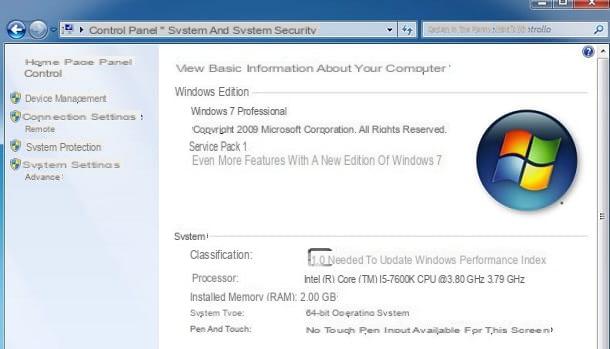
Among the solutions made available by Windows 7, the first I want to talk about is the one called System properties. To reach it, click on the button Home in the taskbar, at the bottom left, or press the key Windows on the keyboard.
In the menu that opens, click on the item computer to open a Windows folder containing hard disk drives and removable storage drives. In the menu bar at the top, click on the wording System properties to access computer information.
In the System you can find the computer performance rating index and information about the processor and RAM installed. In the section Windows EditionInstead, you can read information on the edition of the Windows operating system and any Service Pack installed.
Device management

If you want to analyze the individual items that make up the computer hardware and peripherals, you can draw on the data you find in the panel Device management. To access this tool, follow the same procedure that I indicated in this chapter to view the System properties. When you reach this section, in the left sidebar, click on the item Device management.
Alternatively, you can press the button Home and click on the item Control Panel. At this point, go to the section Hardware and sound and, in the new screen, click on the entry Device management.
After displaying the Device management Windows 7, press the icon with the symbol >, which you will find next to the individual entries, to expand the selection and view the information for each type of hardware component.
System Information

Another useful tool for reading information about computer hardware and software features is System Information. To access this tool, you need to press the key combination Win + R to open Run of Windows.
Within the screen of Run, in the text box, type the string msinfo32 and press pulsating OK. You can also start this function by clicking on Home, typing the term msinfo32 in the bar Search and pressing Enter.
Doing so will launch the panel System Information, in which you can read all the information you want, through the sections in the left sidebar. For example, some data on the amount of RAM memory or the processor model is indicated on the tab System resources.
DirectX Diagnostic Tool

Lo DirectX Diagnostic Tool it's a Windows feature similar to the one I showed you earlier. To use them, open the window Run Windows through the combination Win + R and then, in the text box of the screen that opens, type the term dxDiag, followed by pressing the button OK. In alternative, digita il termine dxDiag in the bar Search from the menu Home and by Submit.
In the screen that is shown to you, using the tabs at the top, you can access various information, such as the data on the monitor and the video card in use or the processor and the amount of RAM installed.
If you want to export information on the characteristics of the PC, perhaps to send it to the technical support of a company that is providing you with hardware or software assistance, press the button Save all information that you find at the bottom right.
Command Prompt

The last Windows default tools I want to suggest to you is the Command Prompt which, using specific command strings, allows you to print the data relating to the characteristics of the computer on the screen. If you want to use this tool, press the button Home and type, in the box Search, the term cmd, Followed by Submit.
In the black screen that you will see, type the command systeminfo I awarded Submit keyboard, so that a report is generated about all the hardware components that make up the computer and information about the operating system. Through another command, wmic baseboard list / format: list, you can get information about motherboard install on PC instead.
Programs to see the characteristics of the PC on Windows 7
If the tools included in Windows did not satisfy you, you can contact some external software used to view the characteristics of the PC. In the next few lines, I'll show you some of them and explain how to use them.
Speccy

The first program I want to tell you about is Speccy, available for free, but for which you can purchase a paid version, at a cost of 14,95 euros (including automatic updates and premium support).
If you want to download this software, you can go directly to the official website and press the button Free download, which you find at the bottom of the page. On the new page that is shown to you, click on the wording CCleaner.com, to download the file .exe.
After downloading the file, double-click on it and hit the button Yes, in the User Account Control window. On the installation screen, click on the button install and wait for the procedure to complete.
Now, start Speccy through its icon that you find on the desktop and wait for all the information to be displayed on its main screen. In the left sidebar, you can find some items that contain the different data, based on their type. For example, if you want to get information about the processor, click on the entry CPU; while if you want to know the motherboard model or BIOS version, go to the section Scheda madre.
To export the information to a text file, click on the entry Fillet (top left) and press on the words Save as XML or Save as a text file, in the menu that opens.
CPU-Z

Another very useful program for viewing PC features is CPU-Z, which is free to download from its official website. Then reach the link I just provided you and click on the buttons Setup English e Download now to start the download.
When the download is complete, start the file .exe obtained and, in the User Account Control window, click on the button Yes. Then select the box I accept the agreement, in the CPU-Z installation screen and complete the setup by pressing in sequence on Next four consecutive times, then on install and finally, su Finish.
Start now CPU-Z via its quick launch icon, so you can access its main screen, and there you will find several tabs that enclose information about the processor (CPU), on the motherboard (mainboard) and all other components of the PC.
If you want to export the information you see on the screen, click the button Tools, which you find below, and select the items Save report as TXT o Save report as HTML from the menu that opens.
GPU-Z

If you need detailed information about your PC's video card, you can opt for GPU-Z, software that can be downloaded for free from its official website and that does not require any installation to work. Then reach the link I provided and click on the button GPU-Z Download.
In the new screen you see, click on the word Standard version and then Download. Then choose one of the available servers and download the file .exe GPU-Z will start automatically. Once you have downloaded the file in question, double-click on it and press Yes, in the User Account Control window.
In the window that is shown to you, click on Noto skip any installation and start the software immediately. On the main screen of GPU-Z, you can view information about the video card, including the manufacturer, model, and version of installed drivers. Through the other tabs, you can access various information, such as real-time graphs of the data detected by the video card sensors.
How to see Windows 7 PC features


