Whether you're on a PC or a Mac, backing up data from your hard drive, however useful it may be, is not necessarily a reflex, because it generally mobilizes the resources of the computer for quite a long time. However, whether using system tools or through a subscription to a cloud service, it is possible to make more regular backups or even less penalizing!
Backup Everything on Windows 7, 8.1 and 10 or Mac with System Tools
Windows 10 and Mac OS X both offer system tools that are a priori dedicated to backup. But by default, these tools have drawbacks: on the side of File History, on Windows 7, 8.1 and 10, the software only backs up user folder trees, for example.
As for Mac OS X, it is of course possible to use time Machine to make incremental backups – but if you want to back up your entire hard drive right away, go your way. As a bonus, if you are under a case-sensitive file system, the disk will need time Machine be it too!
In both cases, there are fortunately more versatile solutions available by digging around a bit in your system tools.
Back up everything on Windows 7, 8.1 and 10 by creating a disk image
There is also another tool to back up your entire hard drive, byte by byte. To do this, you need to go to the tool System Image Backup included in your installation.
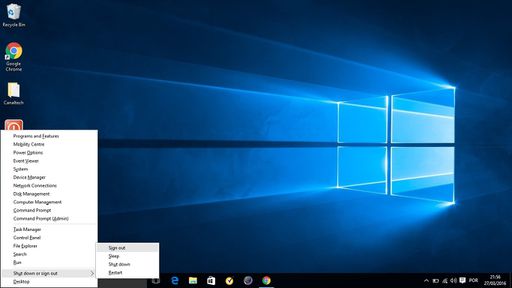
- Right click on the menu Start and run it Control panel
- Go to File History
- In Windows 7, go to Backup and restore
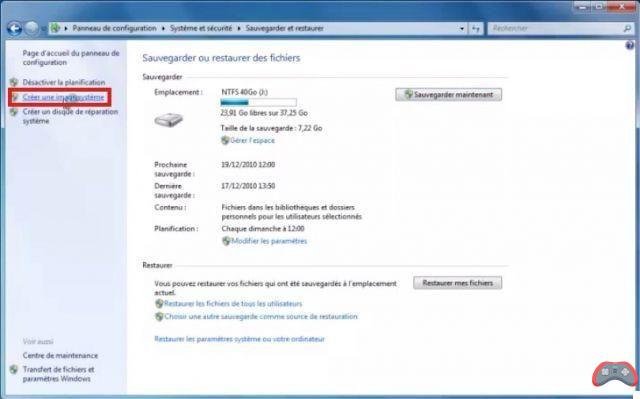
- Click on Create a system image in the left column

- Choose the external hard drive you have plugged in the field On a hard drive And click Next
- Click on Start backup
According to Microsoft, you can use your computer almost normally during the backup. In fact, this is especially true on a (very) powerful machine, and the backup can take several hours. For increased performance, try backing up your computer from safe mode.
- A dialog box should ask you if you want to create a system repair disc

- Click on Yes to burn a disc that will allow you to restore your image later, if necessary. But you can also perform this operation from the Windows installation disc.
The following video should allow you to perform this manipulation very easily:
To recover your data, launch the Windows system repair disc, then as soon as the option presents itself (in the lower left corner of the screen), click on Repair your computer, then in the advanced options click on Recovery from a system image and let yourself be guided.
Back Up Everything on Mac OS X with Disk Utility
Strangely, in use, the best backup tool for Mac OS X is not Time machine, but rather theDisk Utility. Time machine is more designed to be used with the Apple nas, Time Capsule, and to do hyper regular and partial backups, as soon as something changes on the disk. I'Disk Utility on the other hand, allows you to create a complete and faithful image of your hard disk from time to time.
You can then archive it on an external hard drive, and mount it later to access its files.
- Using Spotlight (the magnifying glass at the top right of the screen), launch Disk Utility
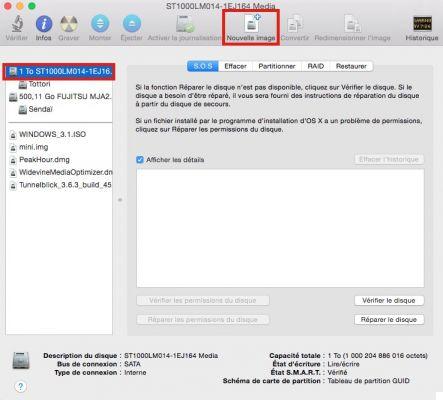
- Choose the hard disk to back up then click on +New picture
- A window opens to let you choose the location of the future disk image: plan an external hard drive with enough space, you can also compress the image or make it read / write accessible if you want by next add files to it

- Wait for the process to complete
To recover files from your backup, just click on the file .dmg corresponding to the backup which will “mount” and appear as a hard drive.
These images, whatever their format, are complete, and you can even try to make them bootable on your external hard drive to launch this copy of your installation at any time. Follow the guide How to make a USB key or an external hard drive bootable to achieve your goals without a hitch!
Back up using a cloud service
Even if the price of external drives is getting lower and lower, they suffer from their fragility, unless you invest in a necessarily much more expensive external SSD solution. However, the price per megabyte online has also fallen. And services like Backblaze offer for less than 5 euros per month a long-lasting 1TB storage service. But he is not the only one here are three with their advantages and disadvantages.
We are not talking here about Apple's iCloud storage services and its Microsoft equivalent, which are more limited and expensive for an equivalent storage space.

Backblaze.com
Backblaze means “backfire” in English – and that's good because this service could well save your data, even if you decide, one day, in anger, to throw this damn machine out the window. Backblaze automatically synchronizes all of your computer's data by default – with no volume limit.
The data is encrypted, and the transfers fast. If your connection leaves something to be desired, Backblaze offers to send your backups by USB key or hard drive physically delivered to Backblaze. The service costs $5 per month, $50 per year or $95 for two years. Sending data via FedEx costs $99 minimum.

dropbox
We recommend Dropbox here, because this service has advanced options for sharing files, and it is likely that those around you already use it. In the paid version, the limit is 1TB in the pro version, and unlimited in Business. The well thought-out client application lets you keep folders automatically synchronized – very handy for your documents, music and movies!
count €9,99 per month for the Pro version, and €12 per month for the Business version.

Crashplan
Crashplan is an online backup service that is also good from the point of view of interoperability, sharing and unlimited volume of data. Crashplan is also distinguished by the 448-bit data encryption: a record for this kind of service (which we imagine can be easily used to search the contents of your computer without your knowledge).
In short, a better service, all cheaper than Dropbox: from $5 per month all inclusive – or $12,50 monthly for multi-account access.
- See also: PC and Mac – how to format a hard drive
Whatever the cloud storage solution, it comes with a client application, which allows you to completely automate the sending of data to the servers in your cloud space. For example, you can set up a folder where all files will be automatically synchronized with online copies. These three services also have an iOS and Android app allowing you to share files online or read them from your smartphone.
The editorial advises you:
- How to Change DNS Servers on Windows 10, Mac, Android, and iPhone
- How to install a Linux virtual machine in Windows 10


