Minimum requirements
On the RocketDock website, we read that to use the program you must have a computer equipped with at least 10MB of free RAM, an processor of at least 500 MHz and a version of Windows between 2000, XP, Vista and 7.
Actually, based on the tests I have done, the software also works very well on Windows 10 and also on the 64-bit version of this operating system, although support for 64-bit systems is not officially present in RocketDock.
In summary, we can therefore say that RocketDock has not been updated for some time, it could show malfunctions on systems not officially supported (eg Windows 10 or other 64-bit versions of Windows), but in practice it can be used without problems even on these last.
Download and install RocketDock
To use a Dock similar to that of macOS on your PC, first of all, connect to the RocketDock website and click on the button Download present at the top. On the page that opens, click Download RocketDock! to download RocketDock.

To install RocketDock, simply double-click its installation file (RocketDock-vxx.exe) and respond Yes notice that appears on the screen. In the first window, select cityno and then click OK. In the next window, click NEXT and then select I accept the terms of the license agreement.
At this point, all you have to do is always click on NEXT and then Install to start the actual installation. Once the installation is complete, you need to click end to close the window.

How RocketDock works
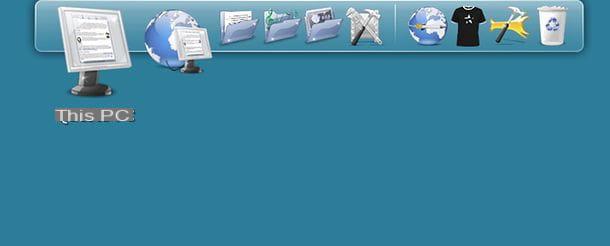
Now you just have to start RocketDock and start customizing it according to your needs. Then open the program (via its icon in the menu Home Windows) and wait for the Dock bar to appear at the top of the desktop.
Now you can move between the icons in the Dock using the mouse and click on one of them to open the corresponding program, folder or document.

If you want, you can add a program, folder or document to the Dock by simply selecting its icon, dragging it to the bar and then releasing the mouse click.

Just as easily, you can remove the “stock” content in the Dock. How you do it? I'll explain it to you right away. Make a long click on the icon you want to remove, drag it out of the Dock and release the mouse button: the icon will disappear into thin air.

After adding an item to the Dock, be it a program, a file or a folder, you can easily change its icon. All you have to do is right click on it and select the item Settings icon give the menu to compare.
In the window that opens, press the button [+] located on the left and choose the folder that contains the icon to use. Then click on the name of the folder in the left pane, choose the icon you want to apply to the Dock element you have selected and press the button OK per salvare i Cambiomenti.
As an icon you can use any PNG file. If you want advice on which sites to use to download icons in PNG format, read my post on where to find free icons.

Once added to the Dock and customized, the icons in the bar can also be reordered freely: just select them, hold down the left click and move them to the point of the bar you most want.
Another interesting thing to know is that it is possible to take advantage of the icon of the Trash can present in RocketDock to view files deleted from the PC (but not yet completely deleted) and to permanently delete them. To view the contents of the Recycle Bin, simply click on the icon for the Recycle Bin. To empty it, instead, right click on its icon and select the item Empty the trash give the menu check if you press.

How to configure RocketDock
Once you have learned all the details related to the operation of RocketDock, you can move on to the more advanced configuration of the program. Let's do some practical examples right away.
Does it seem invasive to you that RocketDock constantly occupies the top of the screen? No problem. You can make the bar appear only when you move the mouse to the top of the desktop. All you have to do is click with the right mouse button in an "empty" point of the Dock (for example the space of the bar with the central separator) and choose the option Auto hide bar give the menu check if you press.

Same goes if you want change the position of the Dock: right click in an "empty" point of the bar (for example the space where there is a central separator), go up Screen position and select one of the options available in the menu that opens: Top, Bottom, Left o Right.
Also, by clicking on the icon Bar settings present in the Dock (the hammer on the right) and choosing the item Location from the window that opens, you can change the position of the bar horizontally and vertically using the adjustment bars Offset e Vertical offset.

In the menu Bar settings you can also change the appearance and degree of opacity of the Dock. All you have to do is select the item Style from the left sidebar and use the drop-down menu Subject to choose the graphic theme to use for the Dock and Adjustment Bar Opacity to adjust the degree of opacity.
Then clicking on the buttons Select font, Shadow color e Line color you can choose the font to use for the texts in the Dock bar and the colors for the shadows and borders of the latter.

To change the degree of opacity, the size of the icons and the zoom effect to be reproduced on hover, select the item Icons from the left sidebar. Then use the adjustment bar Opacity to choose the degree of opacity of the Dock, the adjustment bar Sizes to set the icon size and drop-down menu Passing effect to choose the type of zoom to be reproduced on hover.
Using the control bars located under the items Magnification, Magnification range e Magnification timethen, you can set the percentage of enlargement of the icons on mouseover, the range of the zoom (i.e. the horizontal space occupied by the latter) and the times of the animation to be played during the enlargement of the icons. To save the changes made, click on the button OK.

Selecting the voice Appearance from the left sidebar, you can also set the type of animation that the icons must play when highlighted (eg when the related programs must attract the user's attention to show warnings). Just choose one of the items in the drop-down menu Icon highlight effect and click on the button OK per salvare i Cambiomenti.

Do you want to have RocketDock start automatically when you turn on your computer? Then click on the icon Bar settings (the hammer icon), select the item General from the left sidebar, put the check mark next to the option Activate at startup e pigia his OK per salvare i Cambiomenti.

If, on the other hand, you want to temporarily close RocketDock because you don't need it, right click on an "empty" point of the bar and select the item Logout give the menu to compare.
In case of problems
If RocketDock does not work properly on your PC, you can completely remove it using the Windows control panel.
Then click on the button Home Windows (the flag icon located in the lower left corner of the screen), search "control panel" in the menu that opens and select the del icon Control Panel from the search results.
At this point, go on Uninstall a program, select RocketDock from the window that opens and proceed with the removal of the program by first clicking on the button Uninstall (top) and then always up Yes, Yes e OK.

A PC equipped with Windows 10, you can uninstall RocketDock from the panel as well Settings of the PC. To access it, click on the button Home Windows (the flag icon located in the lower left corner of the screen) and select theicona dell'ingranaggio from the menu that opens (on the left).
Then go on App, select RocketDock from the screen that opens and first click on Uninstall twice in a row and then on Yes, Yes e OK.
How to use RocketDock


